EP-001-ทดสอบยิง Device แรกเข้า Platform ด้วย ESP32
สำหรับท่านที่สนใจจะทดสอบลองยิงข้อมูลจาก esp32 เข้ามายัง otrixiot.com platform ทำได้ง่ายๆ ดังนี้
ฝั่ง server ให้ล็อกอินที่ : http://otrixiot.com/#/System/login/

โดยล็อกอินด้วย ชื่อ : TestESP และ รหัสผ่าน 20202019
และเข้าไปในหน้า device view เพื่อรอดูกราฟ เกจ ที่จะรับค่าเข้ามา

… กดเลือก Device สีเขียว ![]()

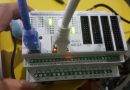
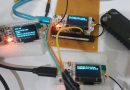
ในฝั่งของ device ทดลองกอปปี้โค้ด นี้ลงไปแล้ว แก้ไขชื่อ wifi และรหัสผ่าน ลงไปแล้วอัพโหลดโค้ดลง esp32 หรือ Heltec ESP32
หรือจะทดลองเปลี่ยนค่า data1, data2, data3
…
ท่านก็จะเห็นค่าถูกส่งผ่านไปยัง platform และแสดงผลได้อย่างง่ายดาย
หลังจากนี้ ท่านสามารถหาอุปกรณ์วัดพื้นฐานเช่น DHT21, DHT22 มาวัดค่า อุณหภูมิ ความชื้นส่งไปยังระบบ โดยสามารถหาโค้ดได้ตามลิงก์นี้
/*
 *  This sketch sends data via HTTP GET requests to data.sparkfun.com service.
 *
 *  You need to get streamId and privateKey at data.sparkfun.com and paste them
 *  below. Or just customize this script to talk to other HTTP servers.
 *  Set board NodeMCU-32S pr ESP32 Dev Module
 *  Set Programmer AVRISP mkll
 */
//=========
#include <WiFi.h>
//======
 //====
const char* ssid     = "Arsenal2019_2.4G";
const char* password = "kb75699212";
const char* host = "otrixiot.com";
const char* code = "ESP32-2020";
float temp_0 = 0;
float humid_0 = 0;
float vHumidity = 0;
float vTemperature = 0;
float data1=15;
float data2=33;
float data3=33;
float data4=100;
float data5=33;
float data6=33;
float data7=33;
float data8=33;
float data9=33;
float data10=33;
float data11=33;
float data12=33;
float data13=33;
float data14=33;
float data15=33;
float data16=33;
float data17=33;
float data18=33;
float data19=33;
float data20=33;
/*
void setup_Sensor_Box_Temperature()
{
  dht.begin();
}
*/
/// ===
// Main setup ========
void setup()
{
    Serial.begin(115200);
    // We start by connecting to a WiFi network
    Serial.println();
    Serial.println();
    Serial.print("Connecting to ");
    Serial.println(ssid);
    WiFi.begin(ssid, password);
    while (WiFi.status() != WL_CONNECTED) {
        delay(500);
        Serial.print(".");
    }
    Serial.println("");
    Serial.println("WiFi connected");
    Serial.println("IP address: ");
    Serial.println(WiFi.localIP());
}
//int value = 0;
void loop()
{
    delay(1000);
    //++value;
    data1 = 35 ;
    data2 = 90 ;
    Serial.print("connecting to ");
    Serial.println(host);
    // Use WiFiClient class to create TCP connections
    WiFiClient client;
    const int httpPort = 80;
    if (!client.connect(host, httpPort)) {
        Serial.println("connection failed");
        return;
    }
    // We now create a URI for the request
     String url = "/api/insertData?device_id=" + String(170)+"&code="+String(code)+"&data1=" +String(data1) +"&data2="
   + String(data2)+"&data3=" +String(data3)+"&data4=" +String(data4)+"&data5=" +String(data5)
   +"&data6=" +String(data6)+"&data7=" +String(data7)+"&data8=" +String(data8)+"&data9=" +String(data9)
   +"&data10=" +String(data10)+"&data11=" +String(data11)+"&data12=" +String(data12)+"&data13=" +String(data13)
   +"&data14=" +String(data14)+"&data15=" +String(data15)+"&data16=" +String(data16)+"&data17=" +String(data17)
   +"&data18=" +String(data18)+"&data19=" +String(data19)+"&data20=" +String(data20);
    Serial.print("Requesting URL: ");
    Serial.println(url);
    // This will send the request to the server
    client.print(String("GET ") + url + " HTTP/1.1\r\n" +
                 "Host: " + host + "\r\n" +
                 "Connection: close\r\n\r\n");
    unsigned long timeout = millis();
    while (client.available() == 0) {
        if (millis() - timeout > 5000) {
            Serial.println(">>> Client Timeout !");
            client.stop();
            return;
        }
    }
    // Read all the lines of the reply from server and print them to Serial
    while(client.available()) {
        String line = client.readStringUntil('\r');
        //Serial.print(line);
    }
    Serial.println();
    Serial.println("closing connection");
    delay(2000);
}
//====
//====
สำหรับแอพ มือถือ สามารถไปที่ Google Store แล้ว download ติดตั้งด้วย system login/password เดียวกันนี้